Overview
Introduction
This guide describes how to integrate the “Pay with PaysafeGo” checkout flow into a merchant website. The integration consists of a frontend component (the payment button and redirect logic) and a backend component (token generation and session creation).
Overview
Wallet Checkout is a closed-loop payment feature within PaysafeGo that enables customers to spend earned commissions directly with the merchant that invited them.
Transactions occur entirely within the Paysafe ecosystem as customer-to-merchant (C2B) wallet transfers, with no external payment rails or credit extension.
Benefits for Merchants:
- Lower transaction costs (no external payment rails)
- Immediate settlement and predictable cash flow
- Higher payment success rates
How It Works
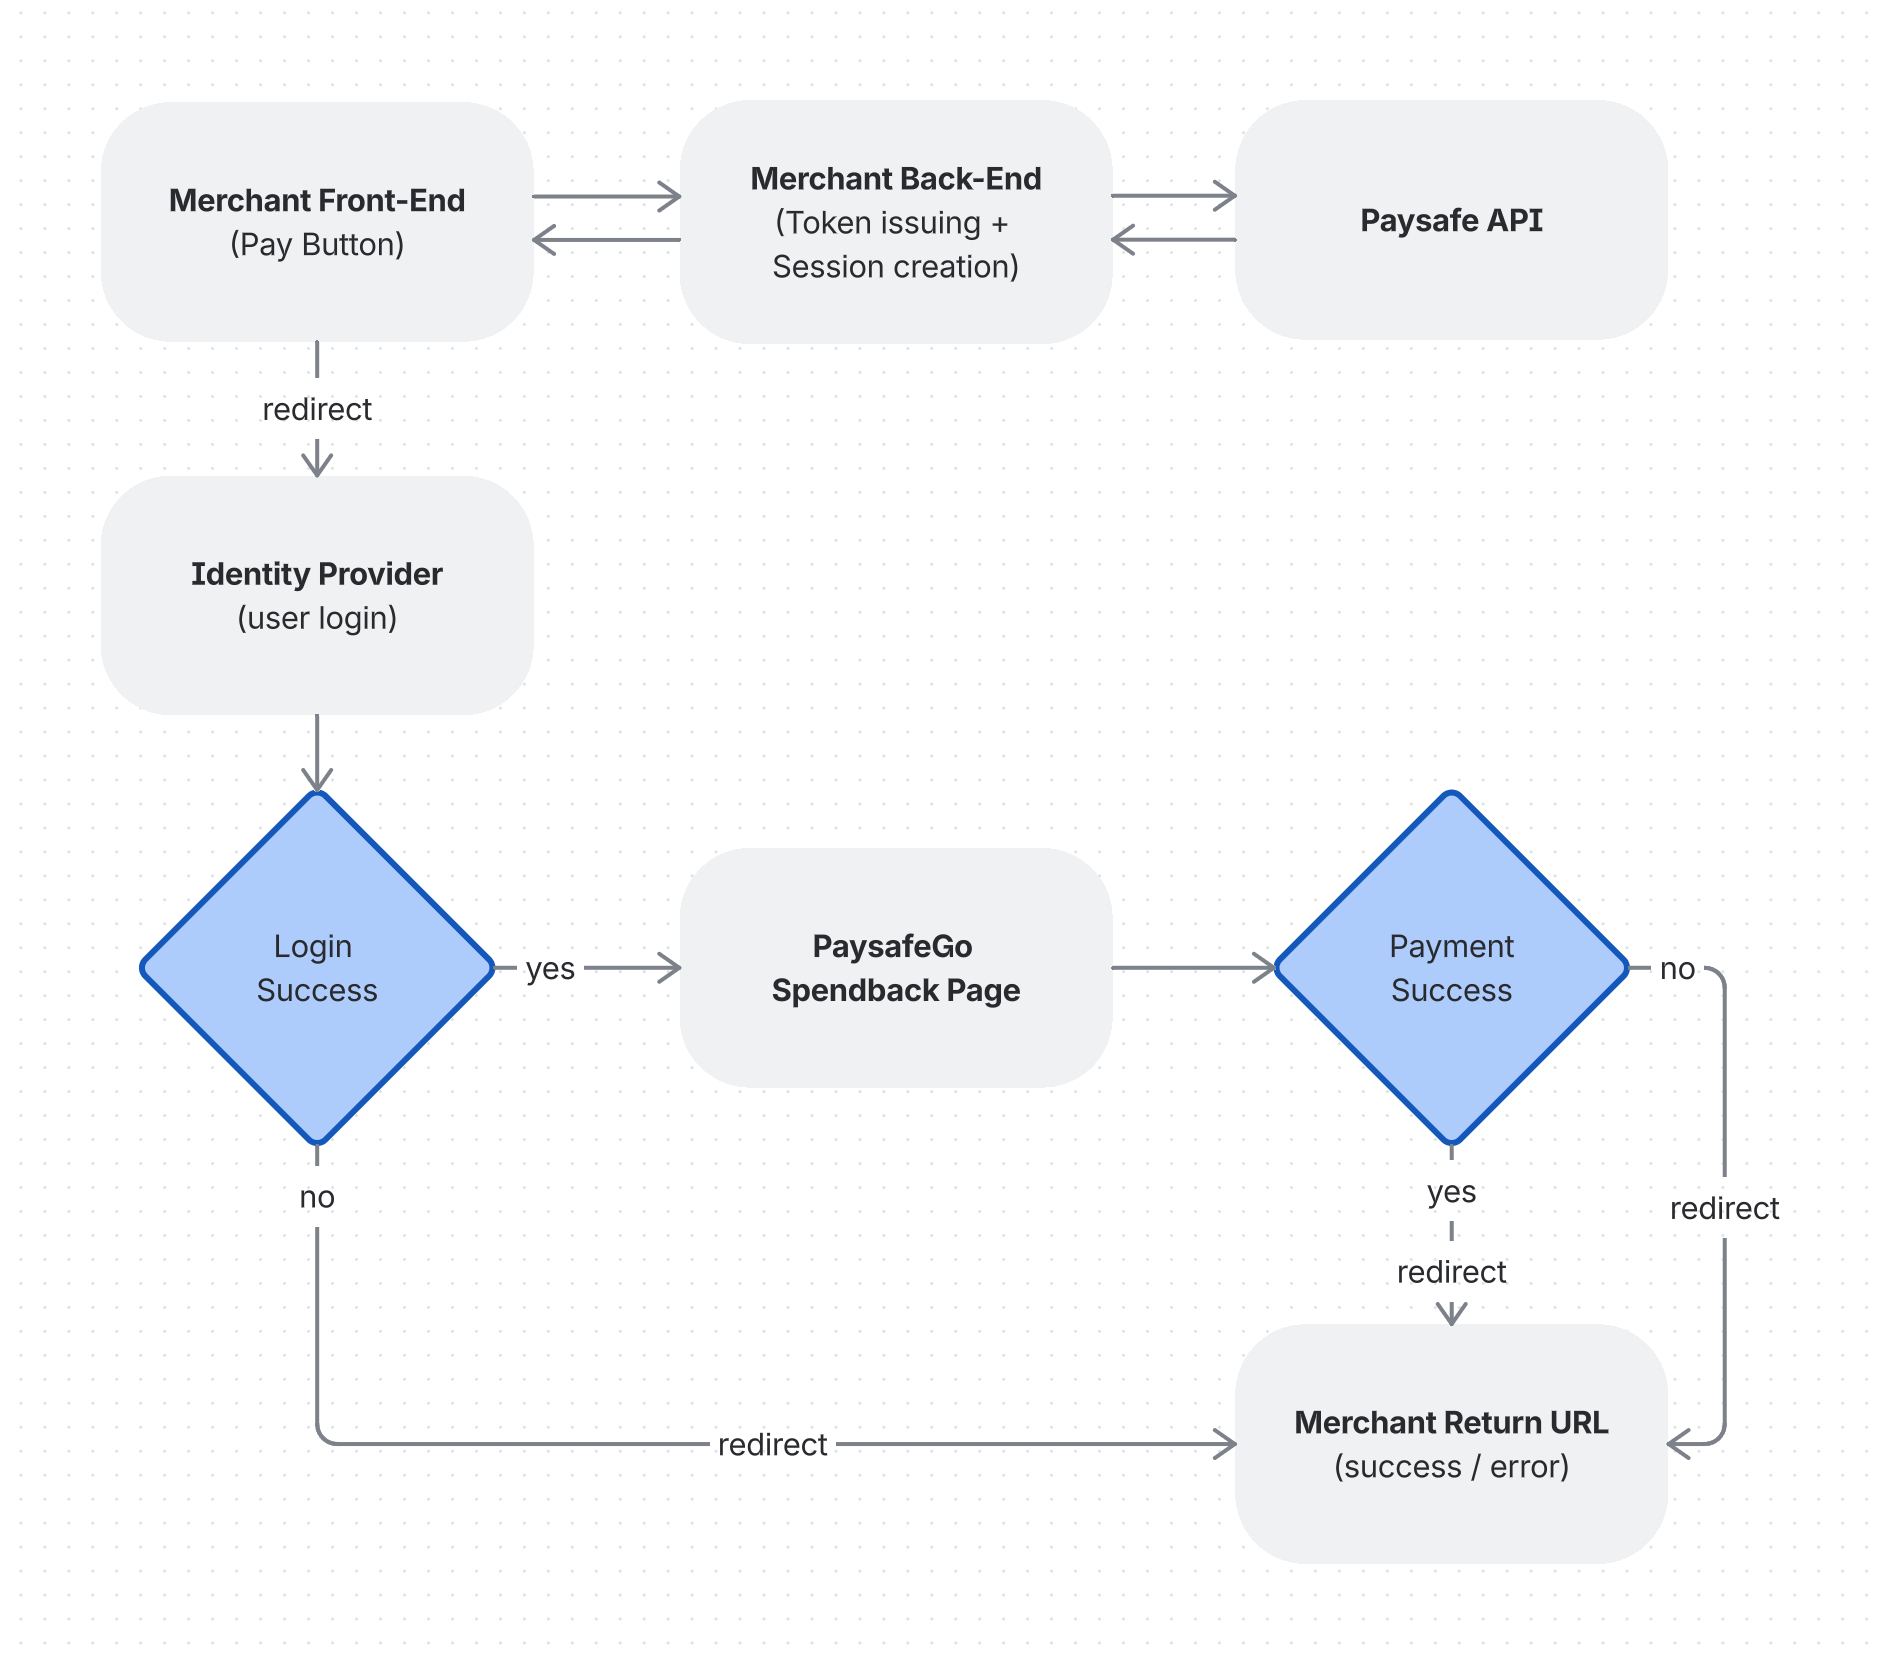
PaysafeGo Checkout flow allows a merchant's logged-in user to pay using their balance inside the PaysafeGo (same tenant). It uses a redirect-based model and consists of the following high-level steps:
- The customer clicks the “Pay with PaysafeGo” button on the merchant page.
- The merchant frontend securely calls the merchant backend to initialise a checkout session.
- The merchant backend authenticates with Paysafe API (via a B2B token) and creates a wallet checkout session.
- The merchant frontend receives the session response and redirects the customer to the Identity Provider page.
- Customer logs-in and authenticates with Paysafe.
- After successful authentication, the customer is redirected to the PaysafeGo Checkout page, where the payment can be previewed, approved or cancelled.
- After the customer completes (or cancels) the payment, Paysafe redirects back to the merchant's
returnUrl(single URL for both success or error scenarios). - Throughout the flow, merchant receives webhooks for the checkout session updates, including the final status.

Integration Roles
| Merchant Owns | Paysafe Owns |
|---|---|
| * Display of a PaysafeGo button, including its text and styling | * Checkout session API |
| * Call own backend to create a checkout session | * Hosted PaysafeGo login, SCA, Checkout preview/finalize/error screens |
| * Redirect the browser to the Paysafe checkout URL | * Server-side P2P transfer |
| * Handle Paysafe webhooks (source of truth) | * Webhook events |
| * Mark the order paid/not paid | * Redirect experience |
| * Handle a local success/cancel/error page |
Prerequisites
| Item | Description |
|---|---|
| API Credentials | A Base64-encoded clientId:clientSecret pair provided by Paysafe for the merchant’s brand. |
| Brand Identifier | Your brand wallet identifier (e.g. MyBrand) |
| Recipient Customer ID | Merchant’s customer ID at Paysafe, which should be the recipient of the customer’s wallet checkout payment. |
| Paysafe API endpoint URLs | URLs of the token issuing and checkout session creation endpoints of the Paysafe API. |
Integration Guide
1. Add the Payment button (Frontend)
The “Pay with your PaysafeGo“ button and its styling is stored at merchant’s website resources.
Example:
<button
  className={`pay-with-paysafe-button ${loading ? 'loading' : ''}`}
  onClick={handlePayWithPaysafeWalletClick}
  disabled={loading}
>
  {loading ? (
    <span className="pay-with-paysafe-button-content">
      <span className="spinner"></span>
      Redirecting to checkout...
    </span>
  ) : (
    <span className="pay-with-paysafe-button-content">
      <svg className="pay-with-paysafe-wallet-icon">
        ...
      </svg>
      Pay with your PaysafeGo
    </span>
  )}
</button>
When the payment button is clicked, an event handler, which is also stored at merchant’s frontend should be executed, which should:
- Send a request to the merchant’s backend to create a checkout session (via a B2B request from merchant’s backend to Paysafe’s Embedded Wallet API) Key fields in the request body:
| Field | Type | Type | Type |
|---|---|---|---|
| merchantRefNum | string | yes | Merchant’s unique order/transaction reference. |
| recipient->customerId | string | yes | Merchant’s customer ID at Paysafe. |
| amount | integer | yes | Payment amount in minor currency units (cents). For example $25.00 should be represented as 2500. |
| merchantRefNum | string | yes | ISO 4217 currency code (e.g. USD, EUR). |
| merchantRefNum | string | yes | The URL on merchant’s site where the customer is redirected after completion of the checkout flow - either successful or not. |
- Receive the checkout session response of the previous step. Key fields in the session response:
| Item | Description |
|---|---|
| id | The session identifier. |
| secureCode | Session verification code. |
| redirectUrl | The URL, to which the customer should be redirected after session creation. Usually it is the URL of the Identity Provider, where the customer authenticates with Paysafe, before redirected to the Wallet Checkout page. |
| status | Session status. |
Example:
const BRAND = 'myBrandName';
const MERCHANT_API_URL = 'https://your-merchant-website.com/api';

const handlePayClick = async (orderId, amount, currencyCode, merchantCustomerId) => {
  try {
    // Build return URL (finalize page), for example:
    const returnToMerchantUrl = `${window.location.origin}/finalize`;
    // Call Merchant's backend, which creates session with Paysafe API and returns its id and code:
    const response = await fetch(`${MERCHANT_API_URL}/create-wallet-checkout-session`, {
      method: 'POST',
      headers: {
        'Content-Type': 'application/json'
      },
      body: JSON.stringify({
        merchantRefNum: orderId,
        recipient: {
          // the merchant's customer ID is the ID of the merchant in Paysafe system and is provided by Paysafe:
          customerId: merchantCustomerId
        },
        amount: parseInt(amount),
        returnUrl: returnToMerchantUrl,
        currencyCode: currencyCode
      })
    });
    if (!response.ok) {
      // an exception might be thrown here, for example:
      const errorData = await response.json().catch(() => ({}));
      throw new Error(errorData.message || 'Failed to create session');
    }
    const sessionData = await response.json();
    // Extract sessionId and secureCode from response:
    const sessionId = sessionData.id || sessionData.sessionId;
    const secureCode = sessionData.secureCode;
    if (!sessionId || !secureCode) {
      // an exception might be thrown here, for example:
      throw new Error('Session creation failed - missing sessionId or secureCode');
    }
    // Build redirect-to-checkout URL from the session creation response:
    const checkoutUrl = new URL(sessionData.redirectUrl);
    checkoutUrl.searchParams.set('sessionId', sessionId);
    checkoutUrl.searchParams.set('secureCode', secureCode);
    checkoutUrl.searchParams.set('brand', BRAND);
    // Redirect to Paysafe checkout page:
    window.location.href = checkoutUrl.toString();
  } catch (err) {
    // handling the exception...
  }
};
2. Create the Backend Endpoint
Merchant’s backend must expose an endpoint (e.g. POST /api/create-paysafe-session) that:
- Generates a B2B access token using your API credentials.
- Creates a wallet checkout session using that token.
- Returns the session data (including
redirectUrl,id, andsecureCode) to the frontend.
Your API credentials (clientId / clientSecret) must never be exposed to the frontend. All Paysafe API calls must go through your backend.
2.1. Generate a B2B Token
| Request | POST {paysafeApiBaseUrl}/digitalwallets/v1/auth/brands/{brand}/token |
| Headers | Authorization: Basic {base64(clientId:clientSecret)}
Content-Type: application/x-www-form-urlencoded |
| Body | grant_type=client_credentials |
Example:
const BASE_URL = 'https://api.test.paysafe.com';
const BRAND = 'myBrandName';
const AUTH_HEADER = 'Basic ' + Buffer.from(`${clientId}:${clientSecret}`).toString('base64');
async function generateToken() {
    const response = await fetch(`${BASE_URL}/digitalwallets/v1/auth/brands/${BRAND}/token`, {
        method: 'POST',
        headers: {
            'Authorization': AUTH_HEADER,
            'Content-Type': 'application/x-www-form-urlencoded'
        },
        body: 'grant_type=client_credentials'
    });
    if (!response.ok) {
        // an exception might be thrown here, for example:
        throw new Error(`Token generation failed: ${response.status}`);
    }
    return response.json(); // { access_token, token_type, expires_in }
}
The clientId and clientSecret variables in the example are needed for token creation.
They are provided by Paysafe and stored securely at Merchant's backend system.
2.2. Create a Wallet Checkout Session
| Request | POST {paysafeApiBaseUrl}/digitalwallets/v2/wallet-checkout/sessions |
| Headers | Authorization: Bearer {access_token}
Content-Type: application/json |
| Body |
{
    "merchantRefNum": "ORDER-123456",
    "amount": 2500,
    "currencyCode": "USD",
    "redirectUrl": "https://merchant.example.com/checkout-finalize",
    "recipient": {
      "customerId": "1234567890"
    }
}
|
Example:
const BASE_URL = 'https://api.test.paysafe.com';
async function createSession({ merchantRefNum, amount, currencyCode, redirectUrl, customerId }) {
  const tokenData = await generateToken();
  const payload = {
    merchantRefNum,
    amount,
    currencyCode,
    recipient: {
        customerId
    },
    redirectUrl
  };
  const response = await fetch(`${BASE_URL}/digitalwallets/v2/wallet-checkout/sessions`, {
    method: 'POST',
    headers: {
      'Authorization': `Bearer ${tokenData.access_token}`,
      'Content-Type': 'application/json'
    },
    body: JSON.stringify(payload)
  });
  if (!response.ok) {
      // an exception might be thrown here, for example:
    throw new Error(`Session creation failed: ${response.status}`);
  }
  return response.json();
}
3. Handle the Return Redirect (Frontend)
After the customer completes the checkout on the PaysafeGo page, they are redirected back to the merchant’s redirectUrl with query parameters indicating the outcome.
Example URL:
https://merchant.example.com/checkout-finalize?status=success&sessionId=abc12345
Handling the return:
// On your return/finalize page
const params = new URLSearchParams(window.location.search);
const status = params.get('status');
const sessionId = params.get('sessionId');
if (status === 'success') {
  // Payment was successful — show confirmation to the customer
  // Verify the session server-side before fulfilling the order, the secureCode for checking the session might be stored in the browser's local storage.
} else {
  // Payment failed or was cancelled — show appropriate message
}
The payment status should always be verified server-side (by querying the Paysafe session API) before fulfilling an order. It should not be relied solely on the URL parameters, as they can be tampered with. The merchant should receive webhooks for checkout session state changes and this should be used for verification.
4. Integrate Webhooks handling (Backend)
While the redirect-based flow provides immediate feedback to the customer, the webhooks are the reliable, server-to-server mechanism for receiving real-time notifications about state changes. You should always use webhooks as the authoritative source of truth rather than relying on redirect parameters alone.
Why webhooks matter
- The customer may close the browser before being redirected back to the redirectUrl to be returned back to the merchant’s website.
- Redirect parameters can be tampered with — webhooks are sent server-to-server and can be verified.
- Some state transitions (e.g. delayed settlements, refunds, KYC updates) happen asynchronously and have no associated redirect.
4.1. Registering a webhook URL
During onboarding, a publicly accessible HTTPS endpoint on merchant’s server should be provided to Paysafe (e.g. https://merchant.example.com/api/webhooks/paysafe). Paysafe will deliver POST requests to this URL whenever relevant events occur.
Requirements for a webhook endpoint:
- Must be HTTPS.
- Must respond with a 2xx status code within a reasonable time (< 10 seconds). If Paysafe does not receive a 2xx, it will retry delivery. (TODO: verify this)
- Must be idempotent - you may receive the same event more than once.
4.2. Checkout session state changes webhook
The checkout session webhook type aim to notify when a session changes state (e.g. from CREATED to BOUND, COMPLETED or FAILED).
Example payload:
{
  "event": "checkout.completed",
  "session": {
    "id": "sess_abc123",
    "status": "COMPLETED",
    "merchantRefNum": "ORDER-12345",
    "amount": 12500,
    "currencyCode": "EUR",
    "receiver": {
      "customerId": "123456789"
    },
    "boundSender": {
      "customerId": "987654321"
    },
    "senderBoundAt": "2026-01-06T12:00:00Z",
    "paymentBoundAt": "2026-01-06T12:02:00Z",
    "completedAt": "2026-01-06T12:05:00Z",
    "payment": {
      "id": "pay_xyz789",
      "status": "COMPLETED",
      "slipId": "txn_def456"
    }
  }
}
Example handler (Express.js):
app.post('/api/webhooks/paysafe', express.json(), (req, res) => {
  const webhook = req.body;
  switch (webhook.event) {
    case 'checkout.completed':
      handleSessionComplete(webhook);
      break;
    case 'checkout.cancelled':
      handlePaymentCancellation(webhook);
      break;
    case 'checkout.expired':
      handlePaymentExpiration(webhook);
      break;
    default:
      console.log('Unhandled event type:', webhook.eventType);
  }
  // Always respond 200 to acknowledge receipt
  res.sendStatus(200);
});
function handleSessionComplete(webhook) {
  const { payment } = webhook;
  if (payment.status === 'COMPLETED') {
    // Fulfil the order identified by merchantRefNum
  } else if (payment.status === 'FAILED' || payment.status === 'CANCELLED') {
    // Mark the order as failed / cancelled
  }
}
For more information about webhooks, please visit the Webhooks section.