Customer Verification
Introduction
KYC or Know Your Customer standards and procedures are established to protect financial organizations against fraud, money laundering, and terrorist financing.
The core of the KYC process is confirmation of the customer’s identity, understanding the customer’s behavior and source of funds, and assessing money laundering risk.
Core terms of KYC as a service:
- ID – Identity verification or confirmation of the legitimacy of provided personal information of the end customers. The provided personal data is compared to the identity verification document owned by the customer.
- AV – Address verification or confirmation of residency of end customers based on provided legit address documents.
- Face verification – Comparison of the end customer's face or biometric data to provided documents or in other words confirmation of ownership of the account.
- PEP screening - Screening over politically exposed individuals, meaning people with political roles or entrusted with public functions, including their relatives.
- Sanction screening - Screening over people, or organizations, engaged in illegal activities. Sanction Lists are published by Governments and International authorities.
The Paysafe KYC solution is part of the Embedded Wallets product, and it is designed to perform Customer Due Diligence on a variety of levels and therefore allows businesses to meet compliance requirements.
Our KYC solution allows you to onboard and verify your customers.
Part of our primary responsibilities as an Embedded Wallet are KYC, PEP and Sanctions, Risk and AML monitoring executed by the name of the merchant, which can ensure the legitimate purposes of customer's account creation and payment processing.
Paysafe KYC via UI Application
In that sense, our KYC solution can provide a complete UI flow for collecting a customer's verification documents and verify their identity and address.
As previously explained Digital Wallet is a service concept in which each customer is assigned to a wallet. The customer's onboarding is followed by the mandatory KYC process.
The verification process includes two main steps – ID verification and Address verification.
ID verification
ID verification is designed to verify the Identity of the customer and their biometrics. The two main ways are via ID document and a selfie or via electronic verification. The methods might vary depending on various factors.
To submit their ID document, customers can take webcam images of the document, upload existing image files from their device (this functionality might be disabled depending on various factors) or switch to their mobile phone and use the phone's camera to take images.
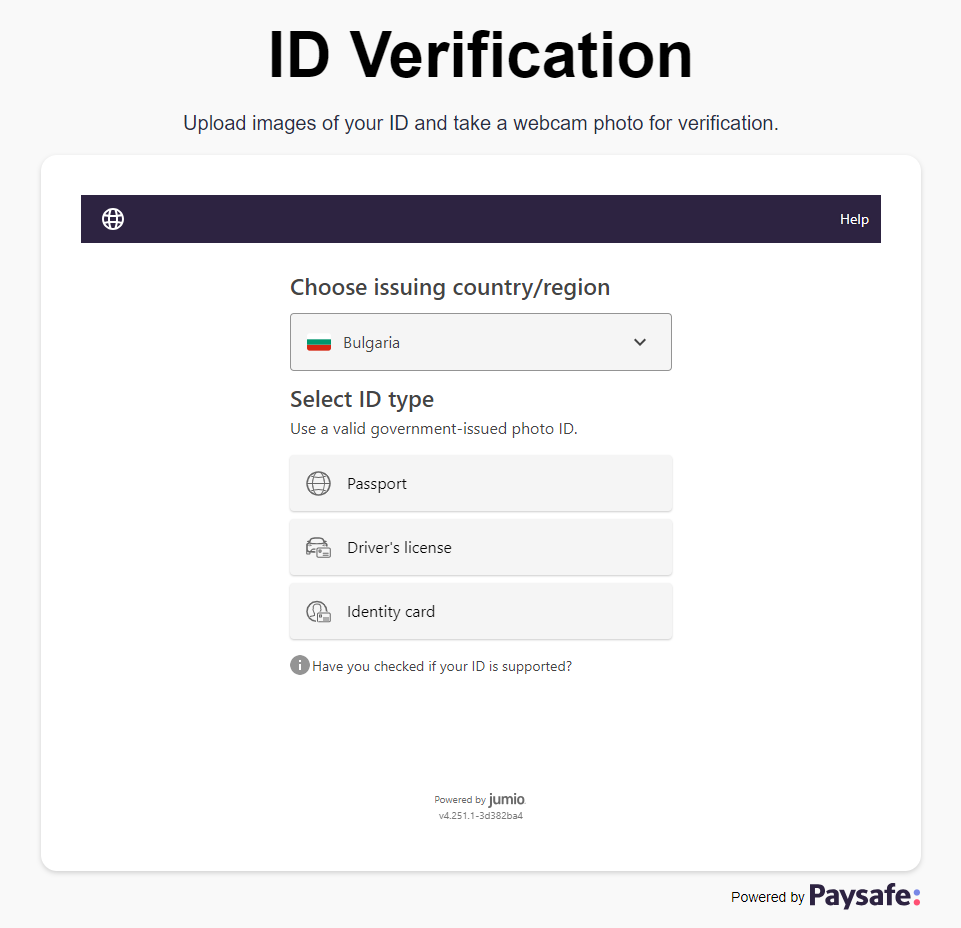


The customer is requested to take a photo of themselves to ensure that they possess the provided documents.
Address verification
The second part of the verification process is the AV step which requests the customer to upload a document for address confirmation (the type of documents and their requirements are explained to the customer when the AV step is initiated). This step can also be completed via electronic verification.
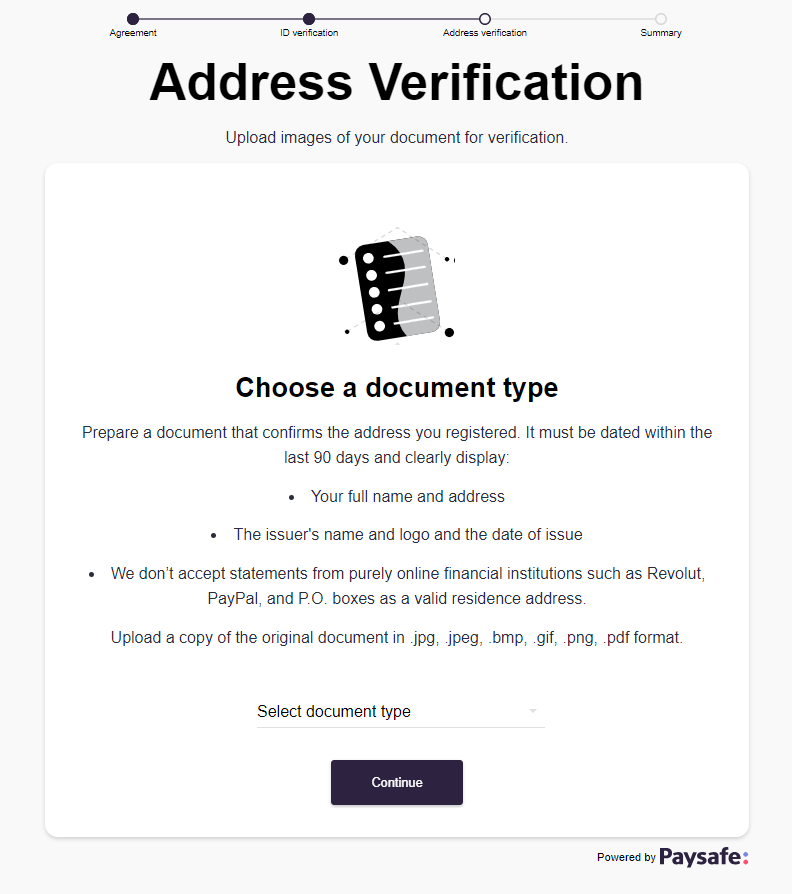


Integration with the Paysafe KYC Application


-
Customer initiates the KYC verification process by clicking on the
Verify your identity(or your equivalent) button in your APP. -
Your app calls the Paysafe API with the help of the Paysafe SDK to create a KYC verification session.
import { Wallet } from '@paysafe/paysafe-wallet-saas-web/wallet';

Wallet.getInstance().getCustomerVerificationService().startKycSession(request)
  .then((response) => {
    // Handle response
}) -
The response contains the redirectUrl to be used for redirecting the customer to the Paysafe KYC UI app.
{
  "sessionId": "8422d64e-4f16-4c41-a36f-f1f11c425f2e",
  "redirectUrl": "<paysafe-kyc-ui-app>"
} -
In your application open the redirectUrl in an iframe.
const iframe = document.createElement('iframe');
iframe.src = response.redirectUrl; -
Customer goes through the verification process in the Paysafe Kyc UI app
-
When the customer completes the flow the Paysafe KYC UI app navigates the customer back to the provided by you
returnUrl. -
You may handle the return flow by getting the KYC session status and deciding where to take your customer.
KYC Verification session
The diagram below shows the verification session lifecycle.


The session begins when the Merchant APP creates a kyc session using the Paysafe SDK. At this moment the session will be with status CREATED and will be expecting initiation. Initiation happens when the customer is redirected to the sessionUrl provided. Once the customer successfully opens the Paysafe KYC UI, the session status is changed to INITIATED. If the customer fails to open the session url or otherwise initiate the session, after a certain time period the session will be considered abandoned and the status changed to ABANDONED.
In an initiated session, the customer will be asked to provide various information in order to achieve the desired level of verification. Should the customer go through all of the required steps, they will be redirected and the status of the session will be changed to COMPLETE. Failing to go through all the steps in a timely manner, the session will expire and the status will be changed to EXPIRED. Often times the user interface will provide the customer with the option to cancel the session. Should the customer choose to do so, the status of the session will be changed to CANCELLED and the customer will be redirected.
COMPLETE, ABANDONED, CANCELLED and EXPIRED are all final statuses, meaning that the customer cannot interact with the KYC Application within that session. Once a session receives a final status, a webhook will be issued containing details of the verification session.
Getting customer Kyc verification status
You can check your customers' Kyc verification status by calling the following endpoint
GET https://api.paysafe.com/digitalwallet/v1/kyc/customers/123456/verification-status
{
  "customerId": "123456",
  "externalId": "dfc3ab16-41d9-43ea-849b-f56c05c91d5e",
  "kycVerificationStatus": "COMPLETED"
}
Alternatively, you can use the SDK's method of getKycStatus.
import { Wallet } from '@paysafe/paysafe-wallet-saas-web/wallet';

Wallet.getInstance().getCustomerVerificationService().getKycVerificationStatus()
  .then((response) => {
    // Handle response
  })
KYC Webhooks
You will be notified via a webhook only after the session concludes. The following notification will be sent to your callback URL. You'll also be receiving webhooks should the status of verification documents changes. An example of this would be:
- Customer uploads a document.
- The document is being processed.
- Customer completes the verification flow successfully.
- You'll receive webhook notifying you of the session end. The message will also include the status of the document, in this case it will be IN_REVIEW or UPLOADED.
- Once the document has been reviewed by us, you'll receive another webhook with the updates status of the document and the updates verification status of your customer.
KYC Provider Simulation
Your customer will be prompted to perform one or more verifications via given KYC providers - e.g. Jumio. We have enabled simulation for the test environment in order to easily reproduce any verification scenario. We are simulating the desired response instead of an actual communication with the provider.
We have simulation mode available for the following KYC providers: IDOLOGY and JUMIO.
Usage:
-
You can enable simulation mode via one of the following options:
- Header -
X-Microservice-Mode: SIMULATION. - Field value - You can use SIMULATION as a field value for any of the following fields:
firstName,lastName,address,city.
- Header -
-
You can specify the desired outcome by selecting one of the values below depending on the KYC provider.
Verification will be performed by the actual KYC provider if you do not use any of the options above.
IDOLOGY Simulation
Use one of the magic strings below as a value in any of the following fields firstName, lastName, address, city:
- SUCCESS_SSN - ID Match, Address Match.
- NO_ADDRESS_PASS - ID Match, SSN Match, No Address Match.
- ID_LOCATED_NO_SSN - ID Match, No SSN Match, No Address (Additional Questions).
- HARD_FAIL - No ID Match, No Address Match.
Examples:
- Header values
- Field values
Header: X-Microservice-Mode: SIMULATION
{
  "address1": "SUCCESS_SSN"
}
{
  "firstName": "SIMULATION",
  "address1": "SUCCESS_SSN"
}
JUMIO Simulation
If the simulation mode is turned on, your customer will be presented with a simulation page for both Identity and Address verifications. Specify the verification result by choosing a "Template" based on the verification type:
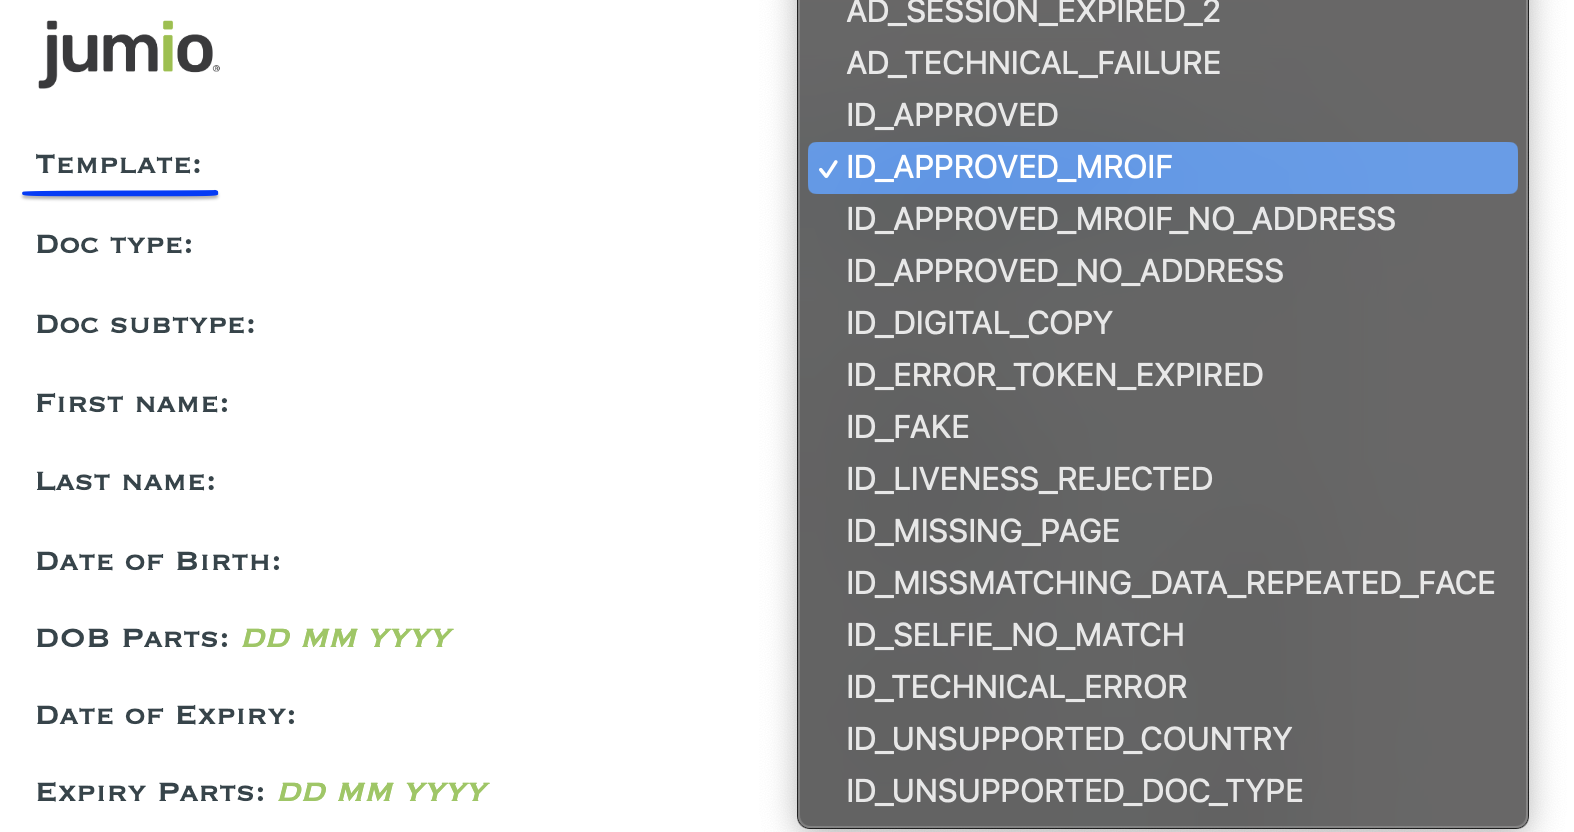


ID Simulation
Approved ID Templates
- ID_APPROVED - APPROVED ID.
- ID_APPROVED_MROIF - APPROVED ID + SELFIE.
- ID_APPROVED_MROIF_NO_ADDRESS - APPROVED ID + SELFIE (even if address is matching, it will not be considered).
- ID_APPROVED_NO_ADDRESS - APPROVED ID (even if address is matching, it will not be considered).
Your customer's document will be automatically approved if the following fields match the ones from the customer's profile: First Name, Last Name, Date Of Birth, Country Code.
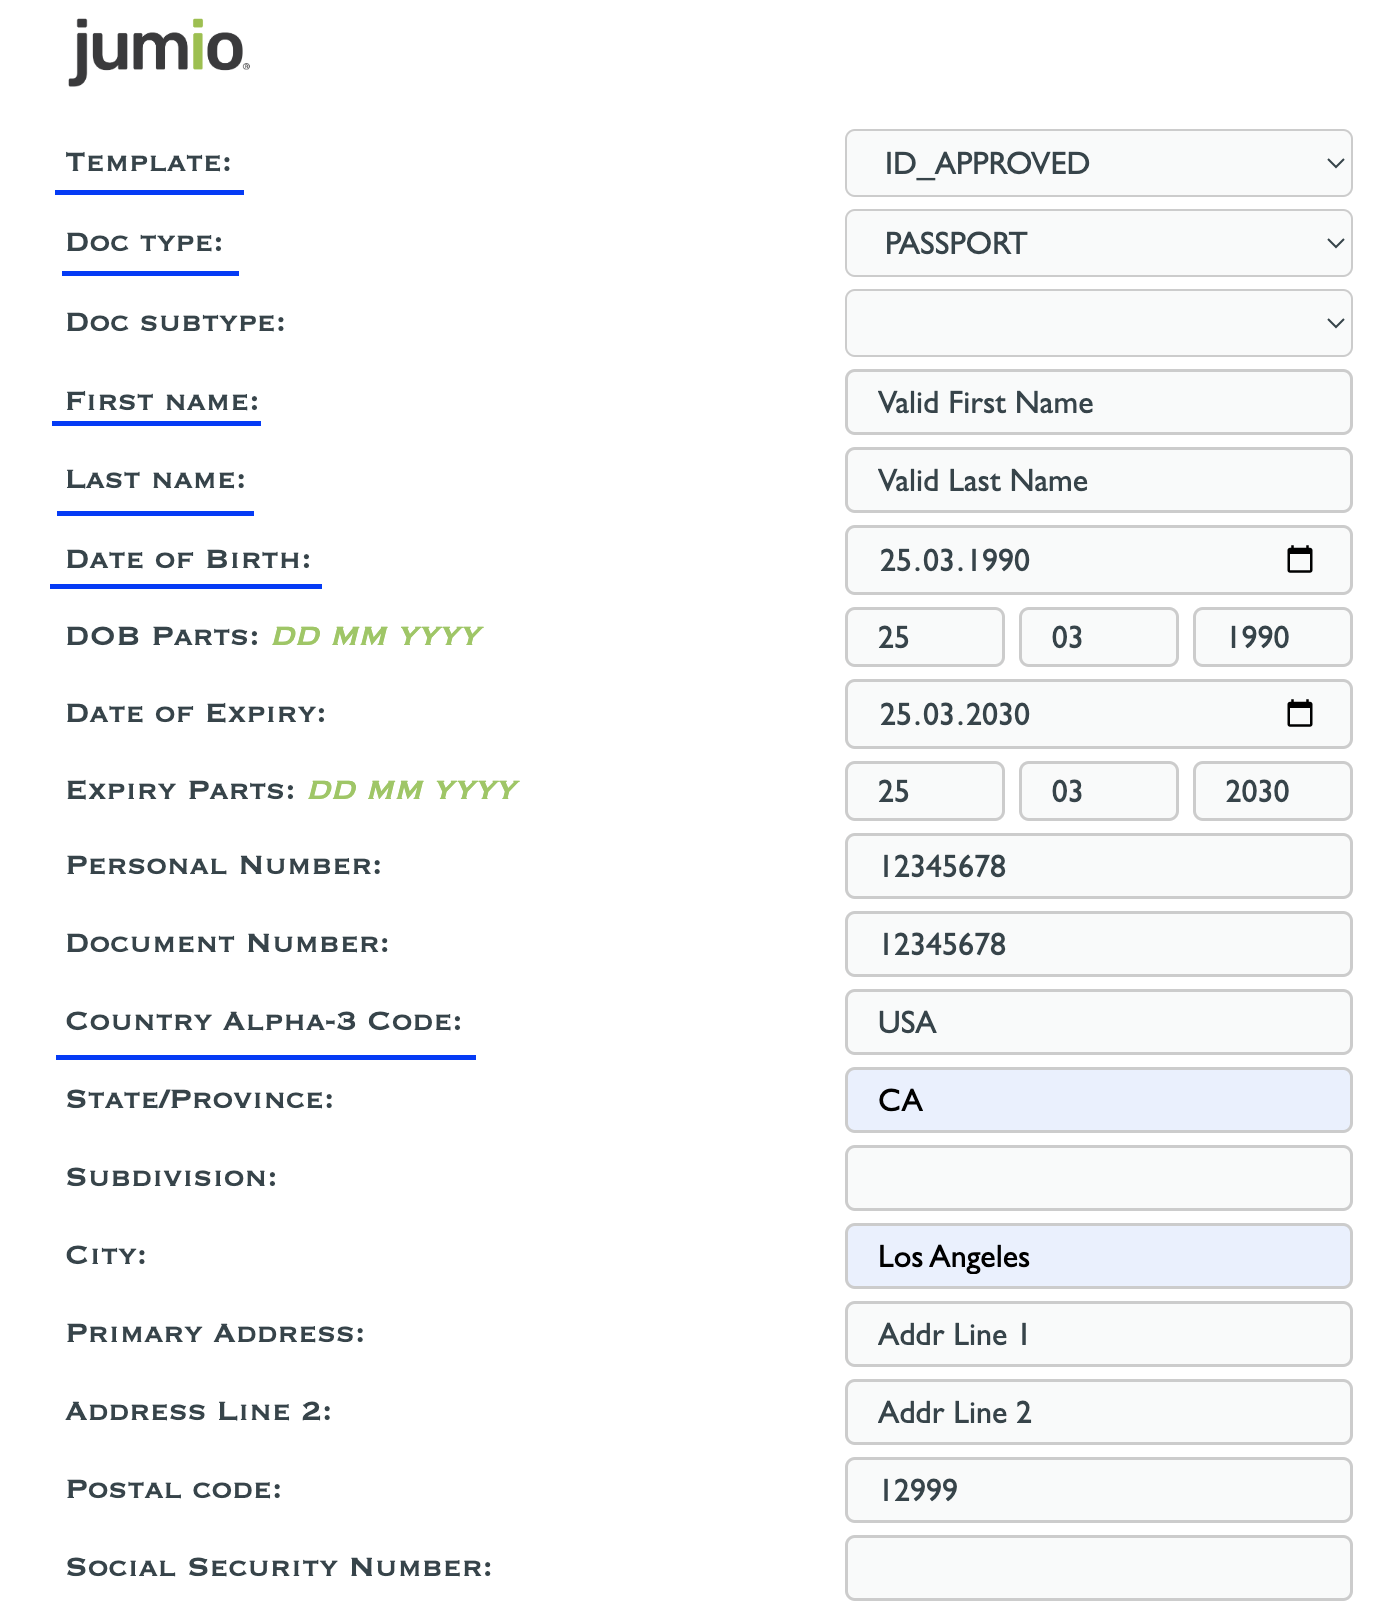


Address Fields
For templates ID_APPROVED and ID_APPROVED_MROIF, address fields Primary Address, Country Code, State, City are also considered.
Updating their values is optional and will not negatively affect the verification. However, setting the correct values would result in a successful address verification from the ID.
Manual Review ID Templates
- ID_FAKE - Fake ID.
- ID_DIGITAL_COPY - Photocopy of the ID.
- ID_LIVENESS_REJECTED - Customer has failed face verification.
- ID_MISSING_PAGE - ID page is missing.
- ID_SELFIE_NO_MATCH - Selfie does not match with the face on the ID.
- ID_UNSUPPORTED_COUNTRY - ID from unsupported by KYC provider country.
- ID_UNSUPPORTED_ID_TYPE - Not supported by KYC provider ID type.
Rejected ID Templates
- TECHNICAL_FAILURE - Jumio failed to process due to technical issues.
- Expired document - Using any template, update "Date of Expiry" field to a past date.
ADDRESS Simulation
Approved Address Document Templates
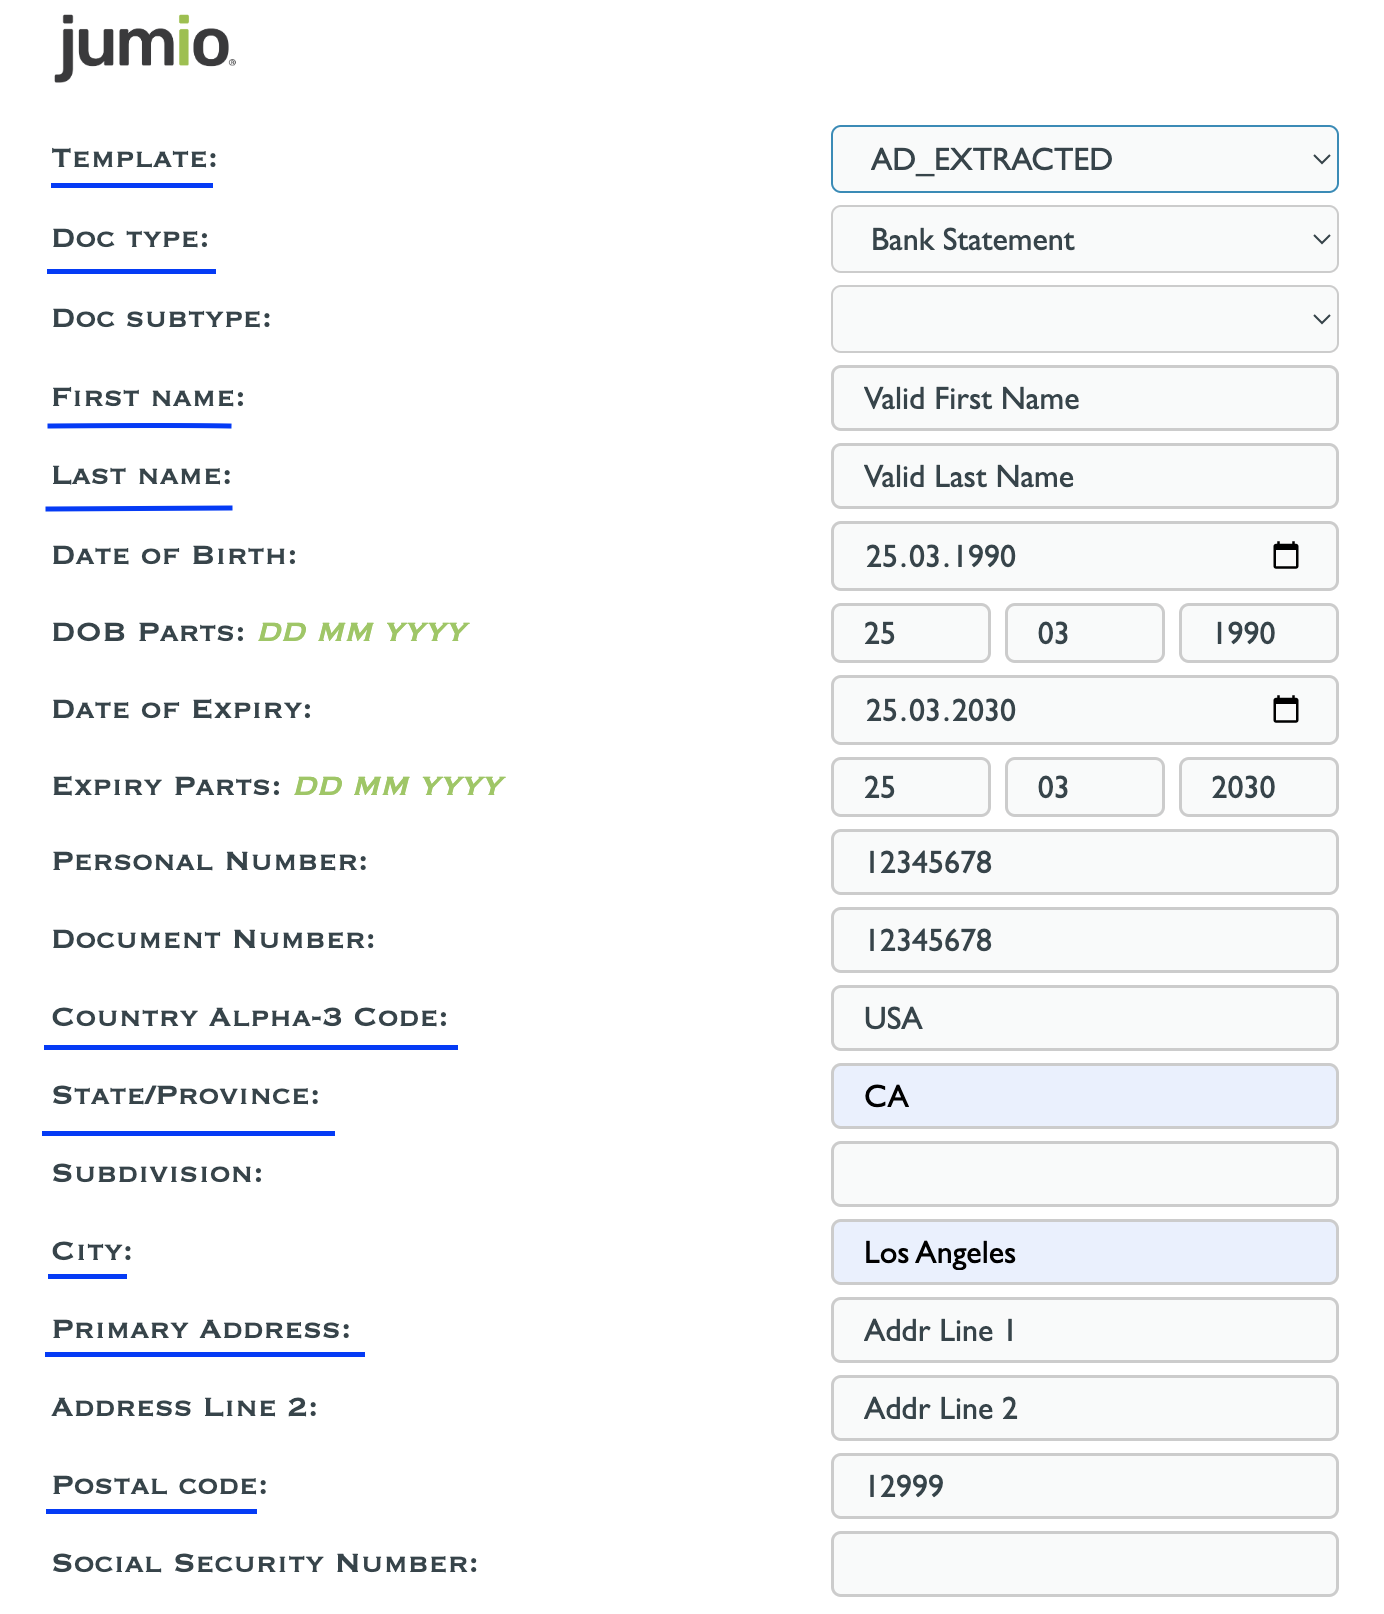
- AD_EXTRACTED - Valid address document with extracted data.
Your customer's document will be automatically approved if the underlined fields below match the ones from your customer's profile. Otherwise, the document would follow the Manual Review process.


Rejected AD Templates
- AD_REJECTED - Invalid document provided.
- AD_SESSION_EXPIRED - Customer has failed to submit the AD within the KYC provider session.
- AD_TECHINCAL_FAILURE - Jumio failed to process due to technical issues.